Tag Archives: execution_environment

Creating and using ansible execution engine in Mac – Apple Silicone [M1]

With ansible 2.x, ansible requires an execution environment to run playbooks.
This was to increase the portability of ansible development. However, with Apple’s new M1/M2 silicone, it has made things rather tricky.

Short Answer:
YOU CAN NOT CREAD RED HAT SUPPORTED ANSIBLE EXECUTION ENGINE in APPLE SILICONE [M1]

Short REASON:
If you decide to use Red Hat’s certified EE minimal images, right at the end, it checks for the validity of the HOST machine.
https://access.redhat.com/solutions/4643601

Since I am using a MAC, it won’t find the valid subscription, therefore it will fail with below error;

....
#20 3.932 + /usr/bin/microdnf install -y --nodocs --setopt=install_weak_deps=0 --setopt=rhel-8-for-x86_64-appstream-rpms.excludepkgs=ansible-core subversion
#20 4.064 
#20 4.064 (microdnf:61): librhsm-WARNING **: 23:54:03.115: Found 0 entitlement certificates
#20 4.075 
#20 4.075 (microdnf:61): librhsm-WARNING **: 23:54:03.128: Found 0 entitlement certificates
...
executor failed running [/bin/sh -c /output/install-from-bindep && rm -rf /output/wheels]: exit code: 1

Longer answer:

YES, you can still create an EE using the community images.

Prerequisites:

  • Brew
  • Ansible
  • Ansible-builder
  • Ansible-navigator
  • docker desktop
  • an environment variable “DOCKER_DEFAULT_PLATFORM=linux/amd64”

Core issues:

  1. Ansible Execution Engine container images are built for x86_64/amd64 whereas MAC M1/M2 are based on arm64
  2. ansible-builder’s default container runtime “podman” is not available in MAC M1

Solutions:

  • Use Docker desktop to emulate x86_64 or AMD64
  • Use an environment variable to set the docker’s default platform to be ’emulated” x86_64/amd64
  • use “–container-runtime docker” option in ansible-builder to switch from the default “podman” to “docker” as the container runtime.
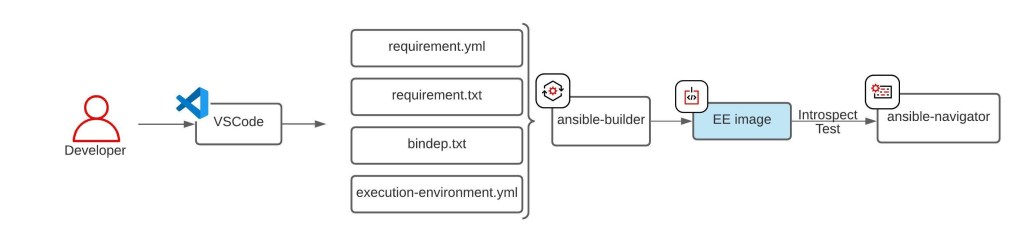
Command to use:

% ansible-builder build --container-runtime docker -v3 -t <EE TAG NAME> <CONTEXT NAME>

Below is the outcome from my command:

Ansible Builder is building your execution environment image. Tags: <EE TAG NANE>
File context/_build/requirements.yml is already up-to-date.
File context/_build/requirements.txt is already up-to-date.
File context/_build/bindep.txt is already up-to-date.
Rewriting Containerfile to capture collection requirements
....
#21 0.362 lrwxrwxrwx 1 root root     12 Jan 12 09:05 yum.conf -> dnf/dnf.conf
#21 0.362 drwxr-xr-x 1 root root   4096 Apr 28  2022 yum.repos.d
#21 DONE 0.4s

#22 exporting to image
#22 sha256:e8c613e07b0b7ff33893b694f7759a10d42e180f2b4dc349fb57dc6b71dcab00
#22 exporting layers
#22 exporting layers 1.3s done
#22 writing image sha256:86e1fe66e05724035fbcf2ecfb3492e70581fd04027ebbe687cad99a00c25d2b done
#22 naming to docker.io/library/<EE TAG> done
#22 DONE 1.3sComplete! The build context can be found at: /Users/david.joo/Documents/ansible/playpan/context

% docker images               
REPOSITORY                   TAG       IMAGE ID       CREATED          SIZE
<EE TAG NAME>              latest    86e1fe66e057   15 minutes ago   1.22GB

Building an execution environment in a disconnected environment

Today is just for me to add a link for me to remember.

Below is a great summary of the issue and how it can be resolved when you try to build an ansible execution environment in a disconnected environment.

https://cloudautomation.pharriso.co.uk/post/ansible-builder-disconnected/

Creating an ansible execution environment with a container image from a container repository with a self-signed certificate

When you try to build an ansible execution environment, you may need to use a container repository with a self-signed certificate.

This will fail with the following error;

.....
ERROR! Unknown error when attempting to call Galaxy at 'https://<URL>/api': <urlopen error [SSL: CERTIFICATE_VERIFY_FAILED] certificate verify failed: unable to get local issuer certificate (_ssl.c:1129)>
Error: error building at STEP "RUN ANSIBLE_GALAXY_DISABLE_GPG_VERIFY=1 ansible-galaxy collection install $ANSIBLE_GALAXY_CLI_COLLECTION_OPTS -r requirements.yml --collections-path "/usr/share/ansible/collections"": error while running runtime: exit status 1

This can be resolved by adding “ANSIBLE_GALAXY_CLI_COLLECTION_OPTS : “–ignore-certs” “

[svc_aap_install@AGAEALP3001264 ee-infoblox-build]$ cat execution-environment.yml 
---
version: 1

build_arg_defaults:
  EE_BUILDER_IMAGE: '<URL>/ansible-builder-rhel8'
  EE_BASE_IMAGE: '<URL>/ee-supported-rhel8'
  ANSIBLE_GALAXY_CLI_COLLECTION_OPTS : "--ignore-certs"

Testing newly create execution environment

Based on previous posts, you probably have created an ansible execution environment.

After you have created an execution environment, how do you test it?

The new ansible CLI tool to run an ansible playbook is called “ansible-navigator”.
It’s not only a ansible-playbook execution binary, but it has more features to it such as:

  • Review and explore available collections
  • Review and explore current Ansible configuration
  • Review and explore Ansible documentation
  • Review execution environment images available locally
  • Review and explore an inventory
  • Run and explore a playbook

But for the testing, this is what you need to do to test the newly created execution environment.

$ ansible-navigator run -eei localhost/<newly created EE name> --pp never <test ansible playbook>.yml

From above, the important option is “–pp never” which stands for “pull policy” “never”.
This means that, since it’s already on the localhost, please don’t download the image.
If for some reason, you forget the option, you will see the following error;

Trying to pull localhost/<new ee name>:latest...
WARN[0000] failed, retrying in 1s ... (1/3). Error: initializing source docker://localhost/<new ee name>:latest: pinging container registry localhost: Get "https://localhost/v2/": dial tcp 127.0.0.1:443: connect: connection refused
WARN[0001] failed, retrying in 1s ... (2/3). Error: initializing source docker://localhost/<new ee name>:latest: pinging container registry localhost: Get "https://localhost/v2/": dial tcp 127.0.0.1:443: connect: connection refused
WARN[0002] failed, retrying in 1s ... (3/3). Error: initializing source docker://localhost/<new ee name>:latest: pinging container registry localhost: Get "https://localhost/v2/": dial tcp 127.0.0.1:443: connect: connection refused
Error: initializing source docker://localhost/<new ee name>:latest: pinging container registry localhost: Get "https://localhost/v2/": dial tcp 127.0.0.1:443: connect: connection refused
[ERROR]: Execution environment pull failed

Also, the ansible-navigator’s default UI mode is “TUI” mode rather than printing out errors to stdout. If you would like to run ansible-navigator in stdout mode, just add an option;

$ ansible-navigator run --eei localhost/<newly created ee> --pp never <test ansible>.yml --mode stdout

Ansible Automation Platform – What is Ansible Automation Execution Environment i.e. EE?

With Red Hat’s Ansible Automation Platform 2.x, one of the big change is the introduction of Ansible Execution Environment.

Then questions rise;
* What is an Ansible Execution Environment?
* What is it for?

What is an Ansible Automation Execution Environment?

Below is a simple diagram summarising what it is.

High level overview of Automation Execution Environment

It is an optimised container environment that contains required “binaries”, “python+other Libraries” and ansible collections to execute an Ansible playbook(s).

Business/Technical Problems to solve:
To Provide a simplified & consistent execution environment to enhance automation development experiences

When a developer/user develops automation on their own environment and shares their own ansible playbooks with other team members, depending on their own development environment vs others, the automation experience could be very different. (Developing Ansible playbooks in a Mac vs Linux)

By creating and using the Ansible Automation Execution Environment, it provides the same development/execution experience.

– Multiple python environments to manage that creates maintenance overhead.

One of the main struggles was that Ansible Tower users had requirements for multiple python virtual environments as the number of users or number of use cases increased. E.g. for use cases, requirements of python 2.7 vs python 3.x or some modules requiring specific versions of python modules.

Above has resulted, within Ansible tower creating multiple python virtual environments, and if you have a cluster of ansible tower nodes, the administrator had to ensure all tower nodes have exactly the same python virtual environment configurations.

Ansible Automation Platform Execution Environment & tzdata

With a colleague of mine, we were testing migration of a ServiceNow – system provisioning ansible workflow from Ansible 2.9 -> Ansible Automation platform 2.x and hit an issue.

No such file or directory: '/usr/share/zoneinfo/zone.tab

My immediate thought would be that “tzdata” pkg is not installed on the UBI.

So added “tzdata” into bindep.txt and rebuild the EE image, but it didn’t work with error saying that nothing to install. (i.e. its already installed, just the file is not available, tested this with “append” in execution-environment.yml

[3/3] STEP 6/6: RUN ls -la /usr/share/zoneinfo/zone.tab
ls: cannot access '/usr/share/zoneinfo/zone.tab': No such file or directory
Error: error building at STEP "RUN ls -la /usr/share/zoneinfo/zone.tab": error while running runtime: exit status 2

To get rid of this issue, I had to just use append to “reinstall” using microdnf tzdata as below;

$ cat execution-environment.yml
---
version: 1
dependencies:
  galaxy: requirements.yml
  system: bindep.txt

additional_build_steps:
  prepend:
  append:
    - RUN microdnf reinstall -y tzdata
    - RUN ls -la /usr/share/zoneinfo/zone.tab
[3/3] STEP 6/7: RUN microdnf reinstall -y tzdata
Downloading metadata...
Package                                Repository       Size
Reinstalling:
 tzdata-2021e-1.el8.noarch             ubi-8-baseos 485.0 kB
   replacing tzdata-2021e-1.el8.noarch
Transaction Summary:
 Installing:        0 packages
 Reinstalling:      1 packages
 Upgrading:         0 packages
 Obsoleting:        0 packages
 Removing:          0 packages
 Downgrading:       0 packages
Downloading packages...
Running transaction test...
Reinstalling: tzdata;2021e-1.el8;noarch;ubi-8-baseos
Complete.
--> 0a9e9e0a1ed
[3/3] STEP 7/7: RUN ls -la /usr/share/zoneinfo/zone.tab
-rw-r--r--. 1 root root 19419 Sep 20 16:34 /usr/share/zoneinfo/zone.tab
[3/3] COMMIT servicenow-ee-29

Ansible Automation Platform – developer high-level workflow

For a customer recently, I had to talk about with Ansible Automation 2.x, what is required to develop ansible playbooks.

Here is a high-level workflow diagram that I drew;

Ansible Automation Platform – developer high-level workflow

So what it is that… When you are writing a playbook and testing it, you need the following components:

  • Ansible IDE tool – my current favourite is VSCode, because there are so many nice extensions + Red Hat recently have released ansible extension
VSCode Ansible extension
  • Ansible-Core – the command line tool, the language and framework that makes up the foundational content before you bring in your customized content.
  • Ansible-Builder – to build execution environments
  • Ansible-navigator – to run, test playbooks with execution environments

If you haven’t built an execution environment, the very first thing that you need to do is to build an execution environment, as below:

4 files that you need to create are;

  • bindep.txt – Bindep is a tool for checking the presence of binary packages needed to use an application / library, so whatever is defined in this file will be installed.
  • requirement.txt – The python entry points to a Python requirements file for pip install -r …
  • requirement.yml – Outlines ansible collection requirements for galaxy to download and include into the execution environment.
  • execution-environment.yml – A definition file as an input and then outputs the build context necessary for creating an Execution Environment image

Detailed examples can be found in:
https://www.ansible.com/blog/introduction-to-ansible-builder
https://ansible-builder.readthedocs.io/en/latest/

Once the required execution environment is ready, it can be shared across your colleagues to enhance the collaboration experiences through consistencies.

Also, now you can start to develop an ansible playbook;

Finally, once you are happy with the playbook and the execution environment, it should be uploaded and managed in source management systems:

  • playbooks – Source Control Management Systems – e.g. github, gitlab….
  • EE image – e.g.) Automation hub, Quay.io, artifactory…

Then those can be properly leveraged by Ansible Automation Platform.

Uploading an Ansible execution environment to a private automation hub

With Red Hat’s new Ansible Automation Platform 2.

Now you have to create an execution environment for you to run your automation.

If you are interested in knowing more about what’s Ansible Execution Environment? and how to build the execution environment please read more on;

  • What’s Ansible Execution Environment?
  • How to build the execution environment?
  • How to run Ansible automation with the new ansible-navigator?

To get into the topic now.

With the new Ansible Private Automation, Red Hat has incorporated a “container registry” into the Ansible Private Automation hub.

Ansible Automation Private Hub 2.0 – Container Registry

So how do we upload the execution environment that you built locally using “ansible-builder”?

Make sure you have your locally built image ready.

For this example, the image name is “my_first_ee_image

(builder) # podman images
REPOSITORY                                                                         TAG         IMAGE ID      CREATED       SIZE
localhost/my_first_ee_image                                                        latest      18ee9d1f8d86  2 weeks ago   747 MB
<none>                                                                             <none>      f64cafba5f7b  2 weeks ago   740 MB
<none>                                                                             <none>      2ee39fed1806  2 weeks ago   747 MB
<none>                                                                             <none>      36ea822bf2b4  2 weeks ago   740 MB
quay.io/ansible/ansible-runner                                                     latest      a24b29574c26  2 weeks ago   725 MB
<none>                                                                             <none>      d5790b11bfe2  2 weeks ago   747 MB
<none>                                                                             <none>      20839e67474e  2 weeks ago   647 MB

1. Log in to your automation hub from CLI

(builder) # podman login -u=admin https://<FQDN or IP>/ --tls-verify=0
Password:
Login Succeeded!

Because, I am currently running my Private Automation Hub locally, I had to add “–tls-verify=0” or “–tls-verify=false” option.

2.  Create a repository structure + tag on the Private Automation Hub using the local repository structure.

(builder) # podman tag localhost/my_first_ee_image <FQDN/IP>/my_first_ee_image

(builder) # podman images
REPOSITORY                                                                         TAG         IMAGE ID      CREATED       SIZE
localhost/my_first_ee_image                                                        latest      18ee9d1f8d86  2 weeks ago   747 MB
<IP/FQDN>/my_first_ee_image                                                        latest      18ee9d1f8d86  2 weeks ago   747 MB
<none>                                                                             <none>      f64cafba5f7b  2 weeks ago   740 MB
<none>                                                                             <none>      2ee39fed1806  2 weeks ago   747 MB
<none>                                                                             <none>      36ea822bf2b4  2 weeks ago   740 MB

3. Upload your build EE to the private automation hub.

The format is that;

# podman push <Image ID> <URL>/<Image name>:<tag>
(builder) # podman push --tls-verify=false 18ee9d1f8d86 <FQDN/IP>/my_first_ee_image:latest
Getting image source signatures
Copying blob 32e86e0f9e53 done
Copying blob f47aeb60ec80 done
Copying blob c6ecf1ab50fb done
Copying blob ba176c23a887 done
Copying blob bb33f1f5d1b5 done
Copying blob f481c8dd5cb9 done
Copying blob 1ad9df8c4500 done
Copying blob 205c0028fa95 done
Copying blob 21adbb7c8fd5 done
Copying blob 3f69621a2c45 done
Copying blob b121b5075674 done
Copying blob 50de17c442cc done
Copying blob 39ac6dd69b36 done
Copying blob 9c229aeded24 done
Copying blob 2653d992f4ef done
Copying blob 48c89702f240 done
Copying blob 07805e10d0e1 done
Copying blob 5f70bf18a086 done
Copying blob 58e24711c0de done
Copying config 18ee9d1f8d done
Writing manifest to image destination
Storing signatures

4. Check it in UI;

Now, this image can be used in Ansible Automation Platform 2.x, as a preview;

How do I know whether “EE” is properly created and destroyed throughout AAP2’s automation execution?

So in the previous series of articles, I have discussed what Ansible Execution Environment (EE) is, and how it is being consumed in the Automation Controller.

But really, how can I tell whether it is being ran or not?

Simple!
This can be validated by running “watch podman ps” on (a) execution node(s).

Below are 3 screenshots from moments of “before”, “during”, “after” a sample automation execution.

Command to run:

# su - awx
# watch podman ps

Before:

Before the automation execution

During:

During the automation execution

After:

After the automation execution

As you can see from the above, execution environment is dynamically spun up as a container and cleaned up right after the execution is completed.